Session, Consumables and Cleaning
13. Past sessions screen
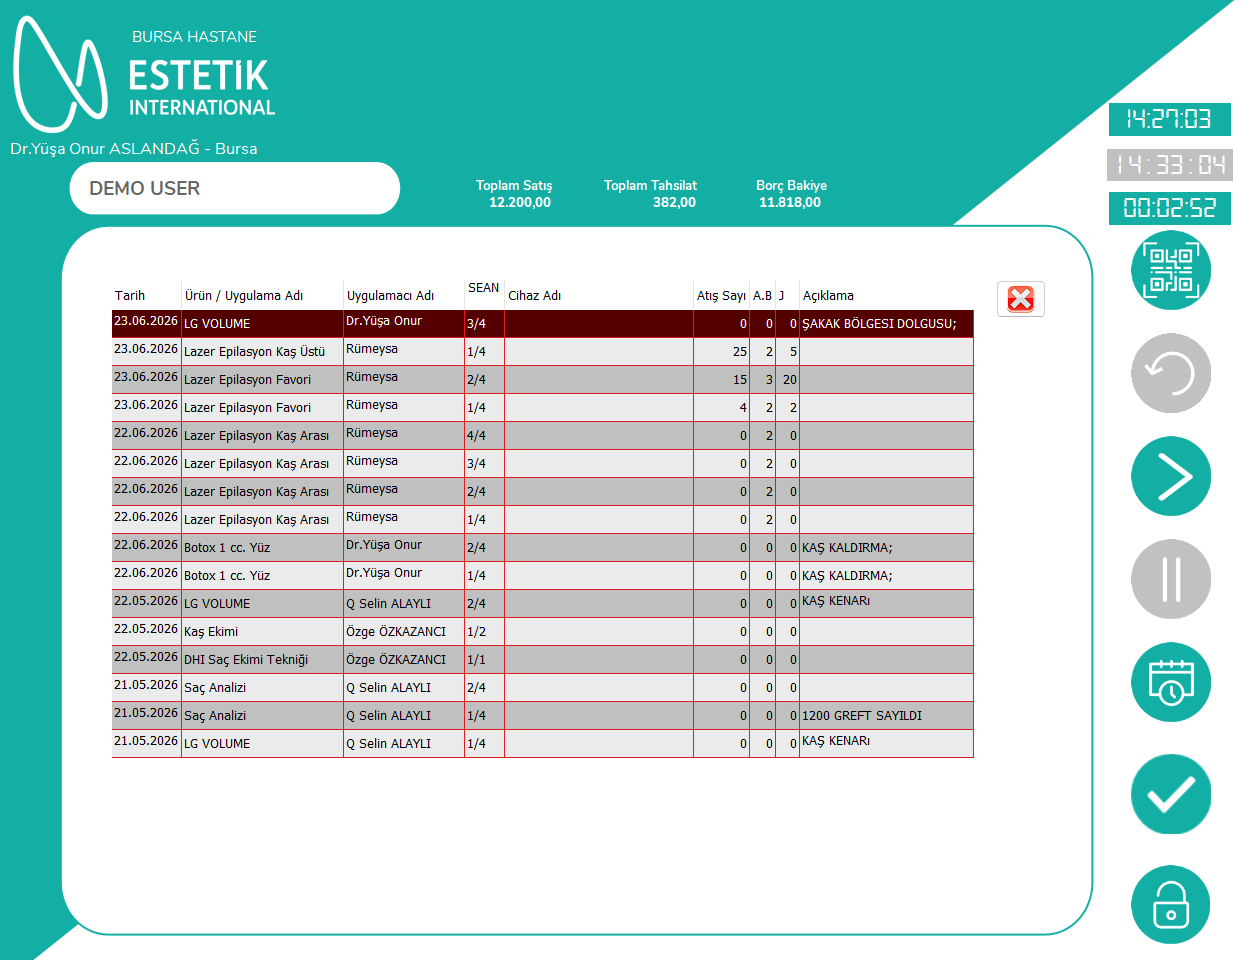
When the past icon is tapped, the current page of the application is remembered and the "Sessions" page opens.

13.1. Listed information
The past sessions table contains these fields according to source record status:
- Date
- Product/service name
- Practitioner name
- Session number
- Device name
- Shot count
- Shot head
- Joule
- Description
- Assistant information
Some technical columns may be hidden in the user view.
13.2. Returning from the past screen
When the return button at the top right is tapped:
- The past screen closes.
- The user returns to the laser, Botox, Filling or other service page where they were previously located.
- The temporary layer locking the screen is removed.
The past screen is only for viewing; old records are not edited from this screen.

14. Consumable material issue during application
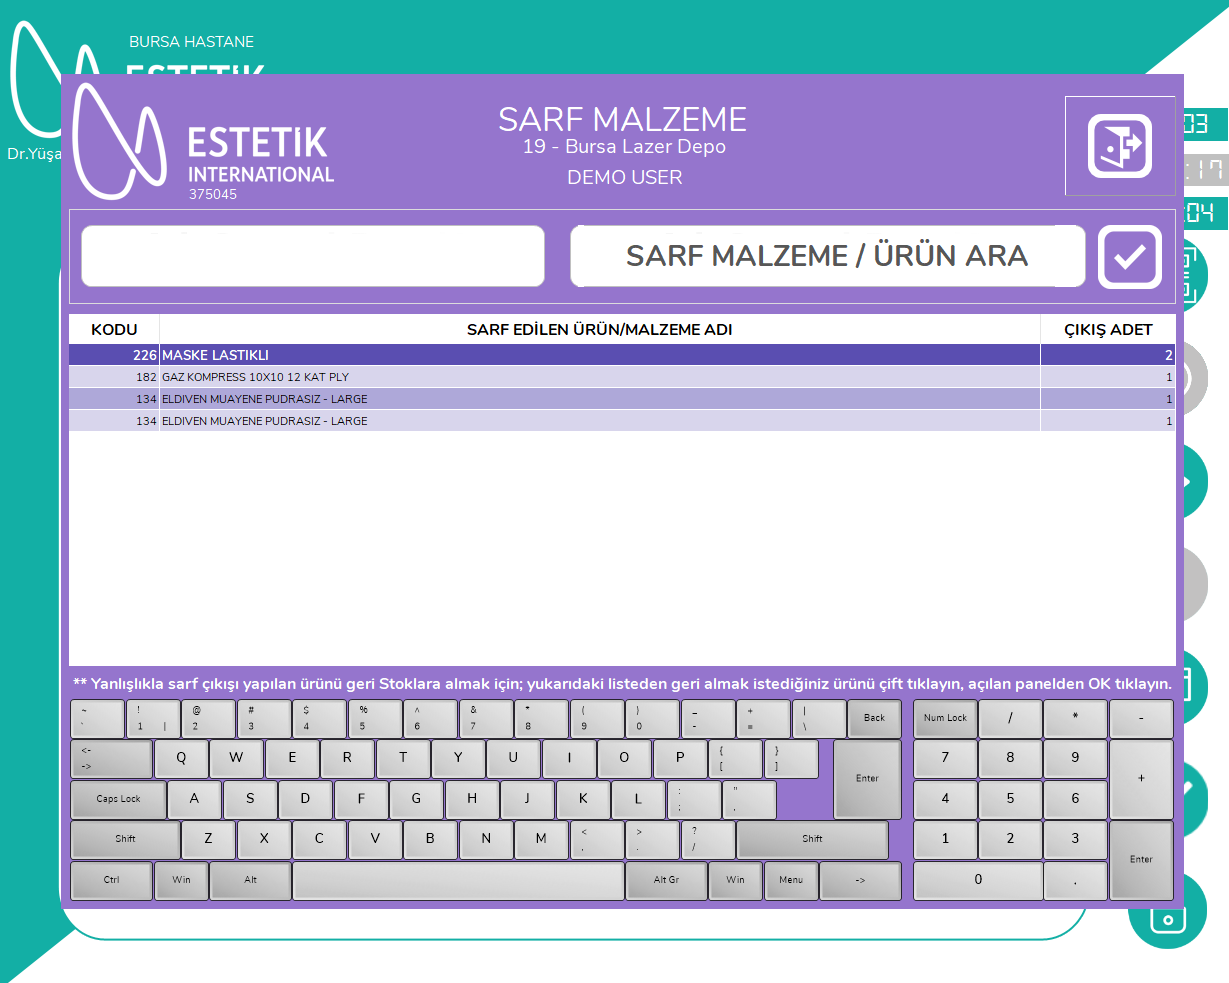
If "Stock Issue by Barcode" is enabled in administrator settings, the QR/barcode consumable icon appears on the main application screen.

When the icon is tapped, the modal "Consumable Material" screen opens. The main application remains open in the background.
For detailed usage, see the "Manual/Barcode Consumable Material Issue" section.
15. Completing the session
When the complete application icon is tapped, the system first checks the temporary session records created in this session.
15.1. If there is at least one service record
For each record, the system saves the following to the central session table:
- Patient file number
- Protocol number
- Service identity
- Start and end time
- Head value
- Joule value
- Shot count
- Practitioner
- Description
- Device
- Assistant
- Branch
- New session number
- Session price/share information
- Total session count
When recording is completed successfully:
- The local/temporary record is marked as completed.
- The room session end time and durations are recorded.
- The "Please wait - product consumable list is being created" panel opens.
- After a short wait, the consumable material/product issue screen opens.
15.2. If session right cannot be deducted
The system shows an error containing:
- Practitioner
- Patient name
- "Session right could not be deducted" information
- Information that the system administrator must be notified
In this case, the user:
- Should not complete the same operation repeatedly.
- Should note the patient and service information on the screen.
- Should inform the system administrator.
15.3. If completion is selected without any service/area record
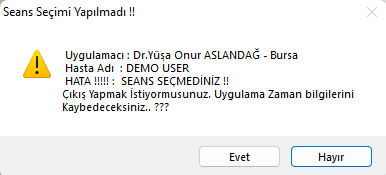
The following confirmation window opens:
Window title:
Session Selection Was Not Made!!
- Yes: The application screen closes, the temporary room session is deleted and application time information is lost.
- No: The application screen is shown again; the user can continue by selecting an area/service.
16. Automatic product/consumable issue screen
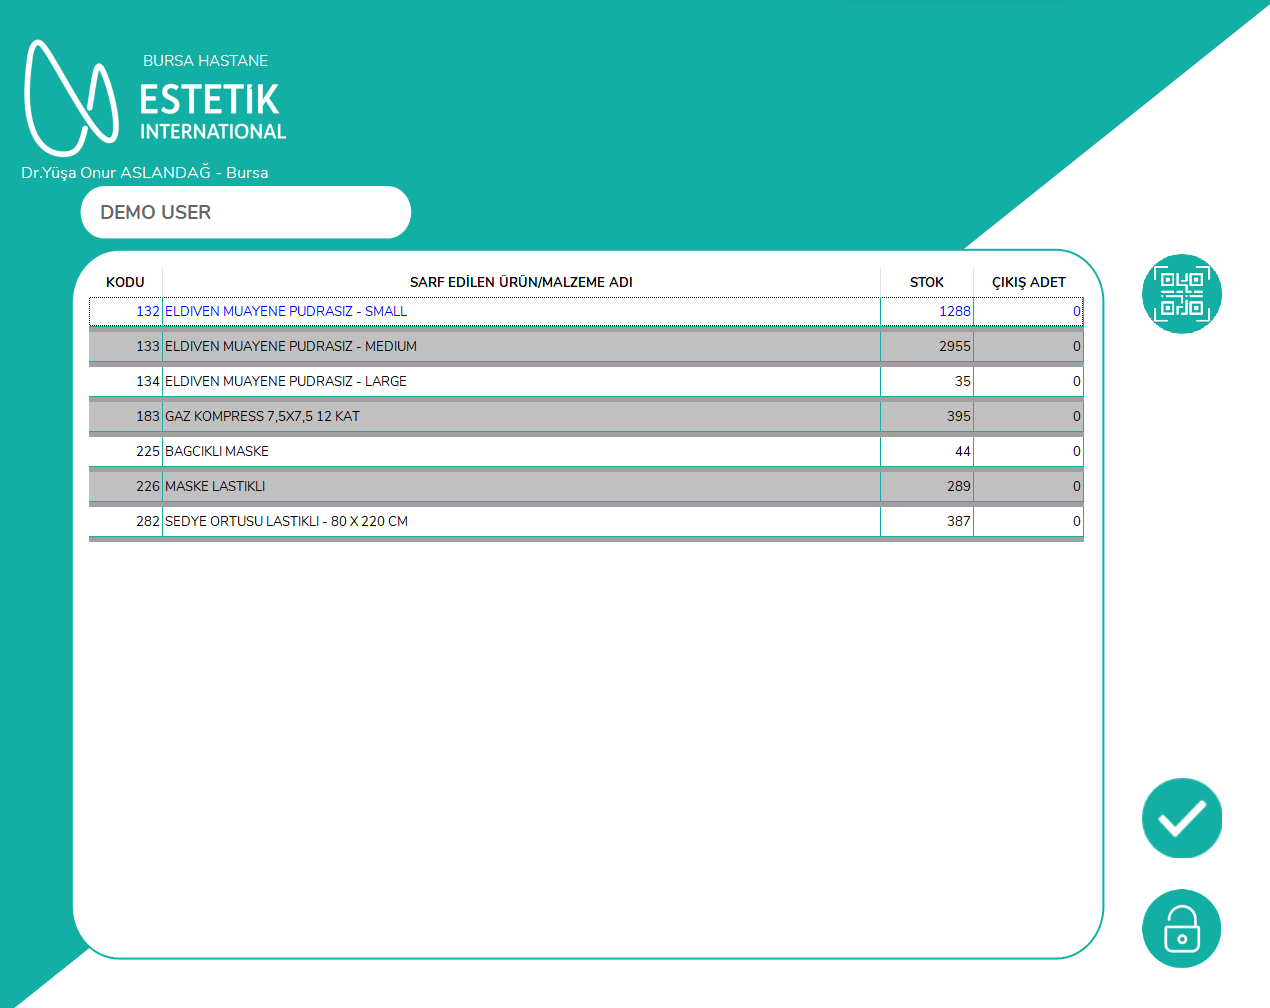
After the session is completed successfully, the "Product Deduction" screen opens.
16.1. Information on the screen
- Branch name
- Practitioner name
- Patient name
- Warehouse identity
- Consumable material/product list
- Current stock
- Issue quantity
- Consumable material/product issue title
- Door lock
- Icon for opening the detailed consumable material screen
- Icon for moving to completion/cleaning screen
16.2. Preparing the product list
The list is created:
- According to the main warehouse in administrator setting,
- From materials with stock quantity greater than zero,
- If there is a service-linked consumable template, only from materials in that template.
16.3. Selecting product from list
- Touch the consumed product row.
- The quantity window opens.
- Product name, product identity, unit and current stock come automatically.
- Default issue quantity is
1. - Change the quantity if necessary.
- Tap the OK button.
After successful selection, the product row may be marked in green.
At this stage, the quantity is written temporarily to the list; the batch stock movement is created when the screen is completed.
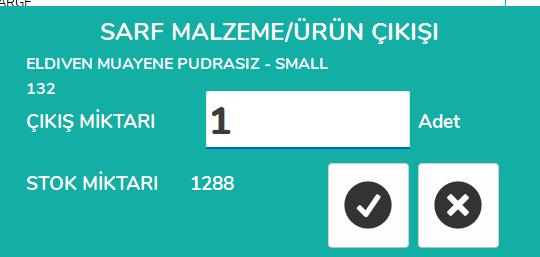
16.4. Cancel in quantity window
When Cancel is selected:
- Product name is cleared.
- Quantity is reset.
- The window closes.
- The list becomes active again.
- No issue is created for the product.
16.5. If quantity is greater than stock
The following error is shown:
- Practitioner
- Patient name
- Product/material name
- Information that issue quantity cannot be greater than stock quantity
- Information that the quantity must be checked
If quantity is zero or negative, no record is made.
16.6. If inventory is being performed in the warehouse
If there is an active inventory operation in the selected warehouse, stock movement is blocked.
The error text states that inventory is being performed in the warehouse and entry/issue cannot be made.
The user should:
- Contact the system administrator or
- Wait for the inventory to be completed.
16.8. Completing product issue
When the completion icon is tapped:
- A stock movement is created for each material in the list with an entered issue quantity.
- The material's warehouse stock quantity is reduced.
- The application screen closes.
- The Room Cleaning screen opens.
The user should not proceed to this step without checking issue quantities.
In the current version, if a technical error occurs for a single product during batch stock recording, some error states may be skipped without showing a separate popup to the user. Before moving to the cleaning screen, stock movement of critical materials should be checked from the authorized report.
17. Manual/Barcode Consumable Material Issue screen
This screen can be opened from two places:
- QR/barcode icon on the main application screen
- Detailed consumable icon on the automatic product issue screen

The screen opens over the main window, always on top.
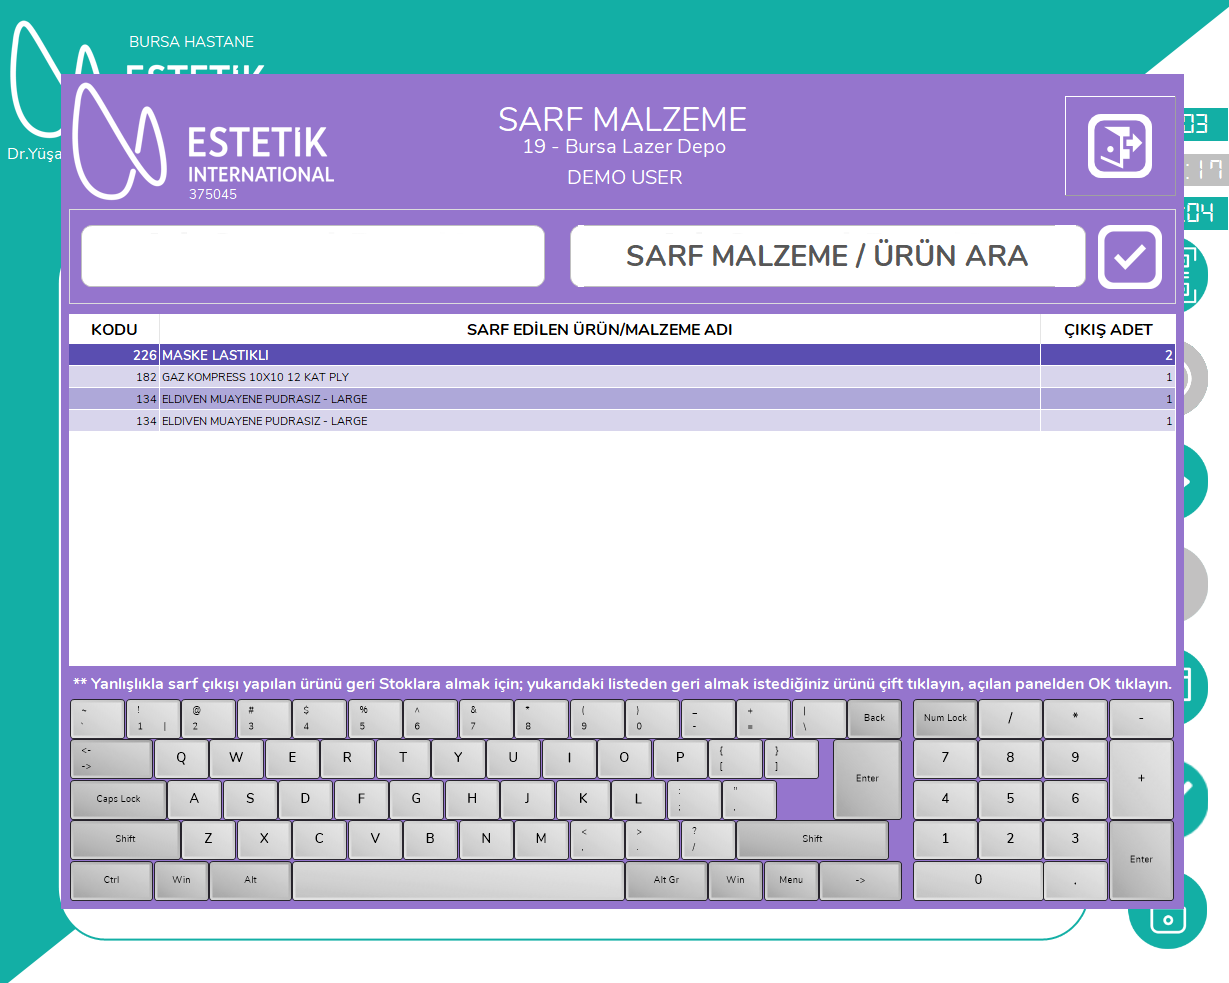
17.1. Information on the screen
- "Consumable Material" title
- Patient name surname
- Protocol number
- Active warehouse
- Barcode reading field
- Consumable material/product search field
- Product search result list
- Previously issued consumable list for this patient/protocol
- Product name
- Product identity
- Unit
- Current stock
- Issue quantity
- Issue confirmation and cancel icons
- Consumable movement undo window
- Warehouse selection area if more than one warehouse is defined
- Close/OK button
17.2. Issue by barcode
- Place the cursor in the "Read Barcode" field.
- Read the barcode or QR code.
- When the field is left, the code is resolved automatically.
- In long square codes, the system tries to extract the EAN-13 section.
- If the product exists in the selected warehouse, the quantity window opens.
- Default quantity is
1. - In the barcode flow, the system proceeds to automatically confirming the issue.
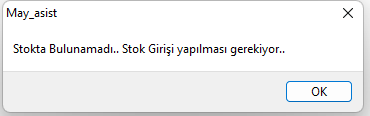
17.3. If barcode is not found in stock
The following message is shown:
Then:
- The quantity window closes.
- Product information is cleared.
- The barcode field is cleared.
- The barcode field is focused again.
17.4. Search by product name
- Touch the "Search Consumable Material / Product" field.
- The search result list appears.
- With each typed character, results are filtered according to the selected warehouse.
- Touch the result row.
- The product is transferred to the selection area and the result list closes.
- Tap the search/selection icon.
- The quantity window opens.
- Enter the issue quantity.
- Tap the confirmation icon.
17.5. If there is no record in product search result
"Not Found in Stock" message is shown and fields are cleared.
17.6. Issue quantity control
Issue quantity:
- Must be greater than zero,
- Must not be greater than current stock.
If the condition is not met, a message is shown with the product name stating that the quantity cannot be greater than stock.
17.7. Effect of issue on stock records
When confirmed:
- A consumable movement is created for patient and protocol.
- The issuing personnel is recorded.
- The selected warehouse is recorded.
- Current stock in the warehouse is reduced by the issue quantity.
- The consumable list is refreshed.
17.8. Multiple warehouse selection
If second and third warehouses are defined, the "Warehouse Selection - Warehouse for Consumable Issue" area appears.
Options:
- 1. Warehouse
- 2. Warehouse
- 3. Warehouse
When the warehouse is changed:
- Active warehouse information is updated.
- Product search list is refreshed according to the new warehouse.
- Subsequent barcode and product searches are performed in the selected warehouse.
Attention: Before confirming the issue, always check that the correct warehouse is selected.
In the current active consumable form, warehouse selection correctly changes the stock query and the warehouse identity in the stock movement. However, the warehouse name label on the screen may continue to show the first warehouse name in some cases. Therefore, the selected radio button and visible warehouse ID should be taken as the basis.
17.9. Undoing a previous consumable issue
- Double-click the product in the previously issued consumable list.
- The "Undo Consumable Material/Product" window opens.
- Product name and previously issued quantity come automatically.
- Tap the undo confirmation icon.
When confirmed:
- The related consumable movement is deleted.
- The issue quantity is added back to the warehouse from which the product was issued.
- The consumable list is refreshed.
When the cancel icon is tapped, undo is not performed.
17.10. Operation block during inventory
If inventory is being performed in the active warehouse, a new consumable issue cannot be made. The system reports that the inventory must be completed or the system administrator must be contacted.
17.11. Closing the screen
When the close/OK button is tapped, the window closes and the previous screen from which it was opened is shown again.
Throughout the form, the Enter key moves to the next field. If the barcode reader sends the Enter character, focus may automatically move to the next control.
18. Room Cleaning screen
After consumable material operations are completed, the Room Cleaning screen opens.
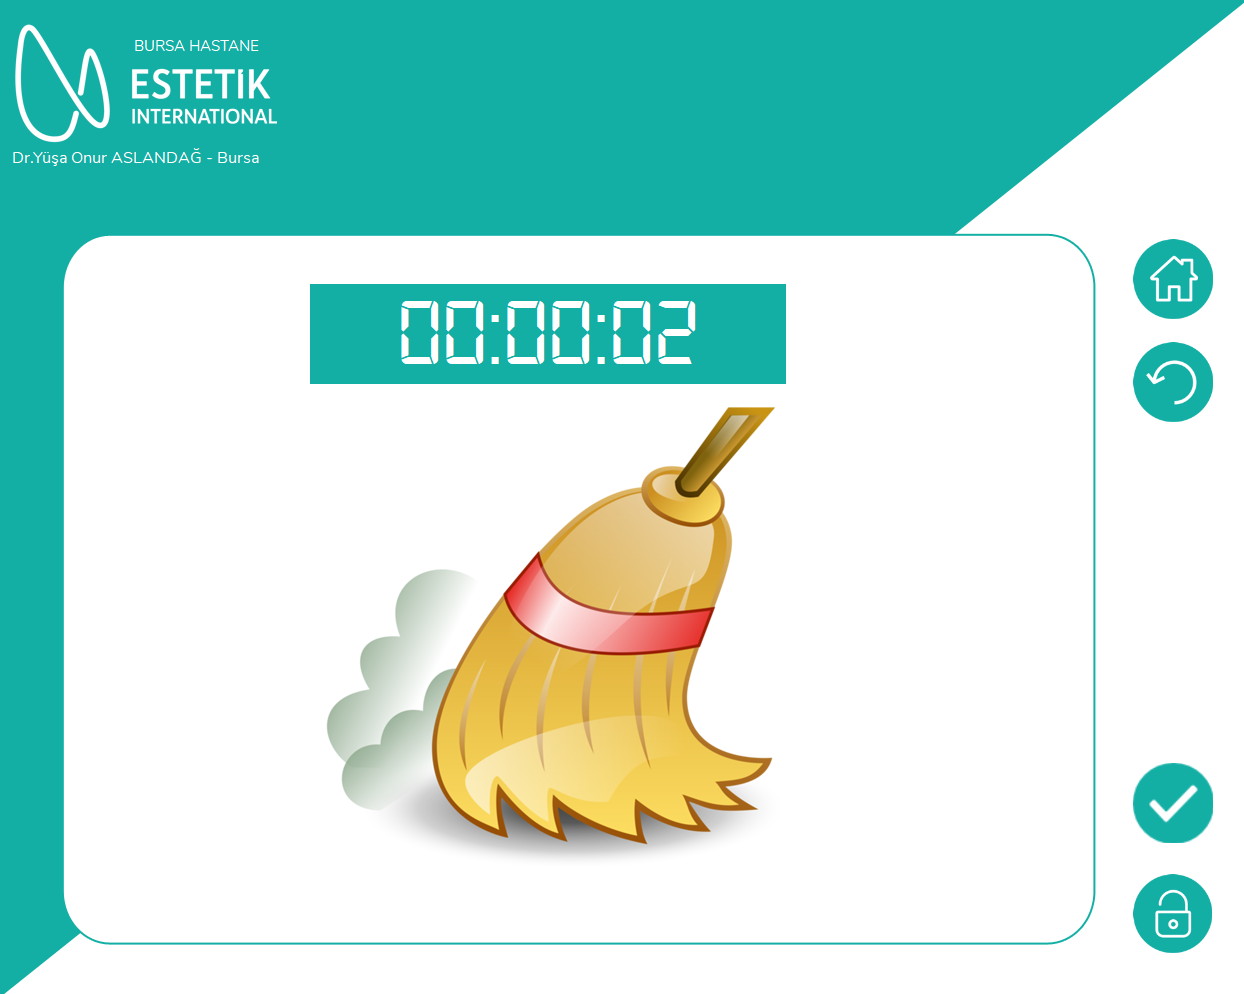
18.1. Information on the screen
- Branch name
- Last logged-in personnel
- Cleaning duration counter
- Door lock
- Exit/complete icons
18.2. When the screen opens
- The cleaning counter starts from
00:00:00. - The room is set to "cleaning" status in the system.
- The counter progresses every second.
18.3. Completing cleaning early
When one of the exit or complete icons on the screen is tapped:
- The counter stops.
- The cleaning screen closes.
- The room is set back to ready/empty status.
- The waiting panel on the login screen is closed.
18.4. Automatic closing
If the cleaning screen remains open for 120 seconds without user action:
- The cleaning screen closes automatically.
- The room is set to ready/empty status.
- User and patient session information is cleared.
- Password and user selection fields are cleared.
- The system becomes ready on the login screen for the next user.
18.5. Door lock
If the door system is active, the door can be triggered with the door lock icon during cleaning.